


Welding optical fibers - what does the welding process look like?
The process of welding optical fibers - how is it going?
The development of optical fiber technology has turned out to be a breakthrough for the entire technology industry. In everyday life, Internet users send more and more data, which is associated with an increased demand for their fast transfer. For this reason too welding of optical fibers is one of the most frequently performed welding jobs and everything indicates that this trend will continue. But what exactly does the fiber welding process look like?
Why welding?
At the beginning, it is worth mentioning that welding optical fibers is not the only way to mount them. Another method is to use the so-called mechanical welding. It uses special parts that are prepared in advance to connect the two ends. Thanks to this, you can connect two ends of the cable with a ready-made splice, without the need to use an optical fiber splicer. While this method may appear to be much simpler than standard welding, it is much less efficient, offering lower quality joints. In addition, welds wear out over time, losing their properties. Therefore, fiber optic welding remains the more popular method.
How to prepare optical fiber for welding?
Before you start welding optical fibers, you should properly prepare the cables. It is not an easy task, the whole thing requires great precision, and the slightest mistake can cause problems with the data transfer in the final product. First of all, you should prepare the appropriate length of the optical fiber. The key here is to choose the right cable length, too short a cable is impractical, while too long will cause maintenance problems and is more susceptible to a number of mechanical damage
The next step before welding optical fibers is to prepare a suitable switchgear or muff. Here, too, you need to pay attention to what exactly hardware you will need for installation. There is a wide selection of distribution boxes available on the market, so you should first of all pay attention to where the optical fiber will be mounted. These parts vary in shape and size depending on where the cable is going to be placed. Most often these are wall-mounted joints or those adapted for passing cables underground or between walls. However, it should be remembered that improper selection of the distribution box exposes the installations to mechanical damage. One of the main reasons these parts are mounted is the welding shield of the optical fiber. A well-chosen distribution box or sleeve protects the cables and saves future labor and maintenance expenses.
Once the cables are inserted into the distribution box or sleeve, the next step is to cut them properly. Precision plays a very important role here, because improperly cut cable will cause problems with data transmission over the optical fiber. A number of specially prepared devices are used for this, such as strippers or Kevlar scissors.
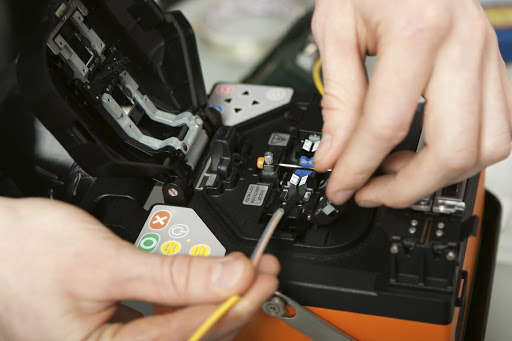
What does fiber optic welding look like?
After placing the cables in the distribution box and appropriate cutting, you can proceed to the actual process of welding the optical fibers. A special fiber optic splicer is used for this. When two cable ends are introduced into it, it creates an electric arc which, in turn, fuses the fronts of the optical fibers, joining them together and centering them. This ensures a precise and strong weld, on which a heat-shrinkable cover is put on at the end. After the optical fibers are welded and the installation is finished, the whole thing should be checked with an optical power meter, so as to catch any errors in the weld.
